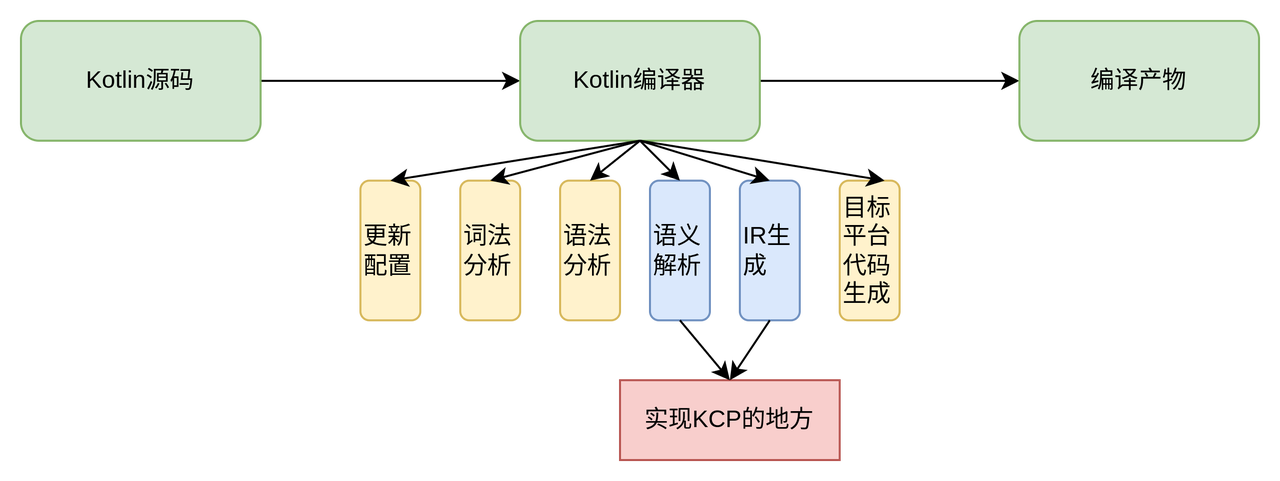
Begin with KCP 什么是 KCP KCP 是 Kotlin 的编译器插件,允许开发者在 kotlinc 监听和拦截不同的编译阶段,进行代码检查、修改源码、生成额外代码等操作
KCP 是强大的元编程工具,然而学习成本较高,涉及到 Gradle Plugin、Kotlin Plugin 的使用,API 还涉及到编译器的知识
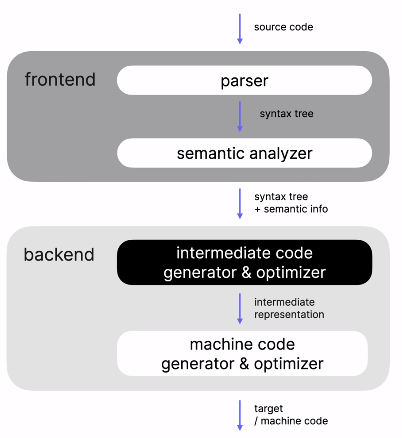
Kotlin 编译器 什么是编译器 编译器是一个黑箱,它的输入是源代码,输出则是机器码或者目标代码
Frontend:被划分为语法解析器 parser 和语义分析器 semantic analyzer
Backend:被划分为中间代码生成器和机器代码生成器,其中中间代码生成器是可选的
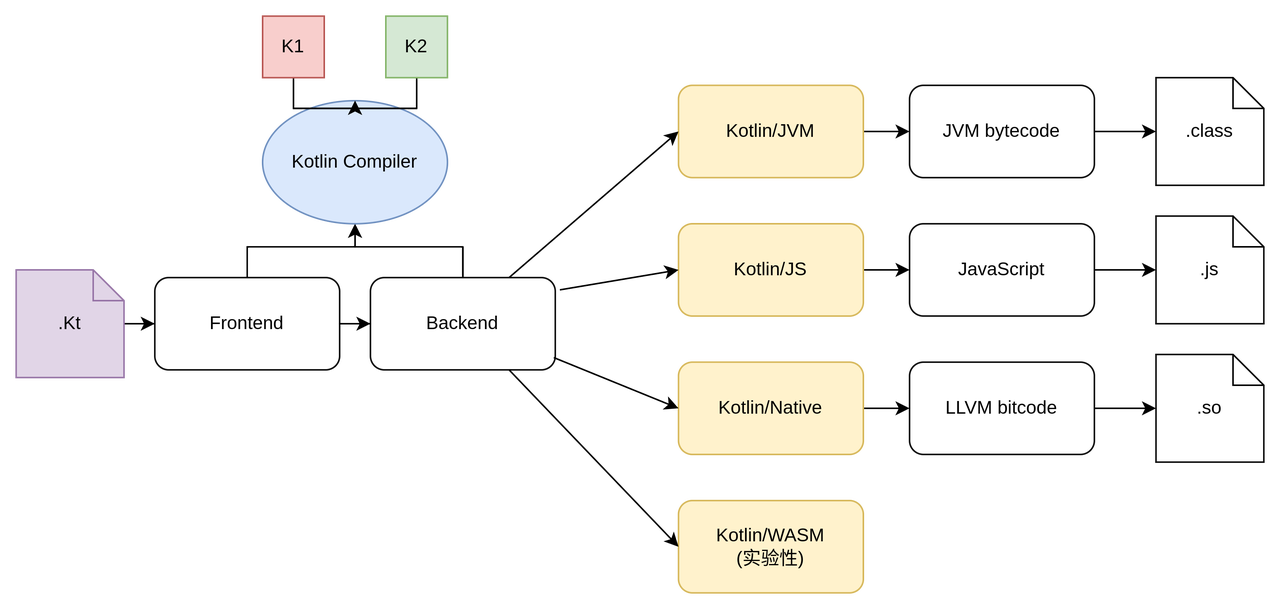
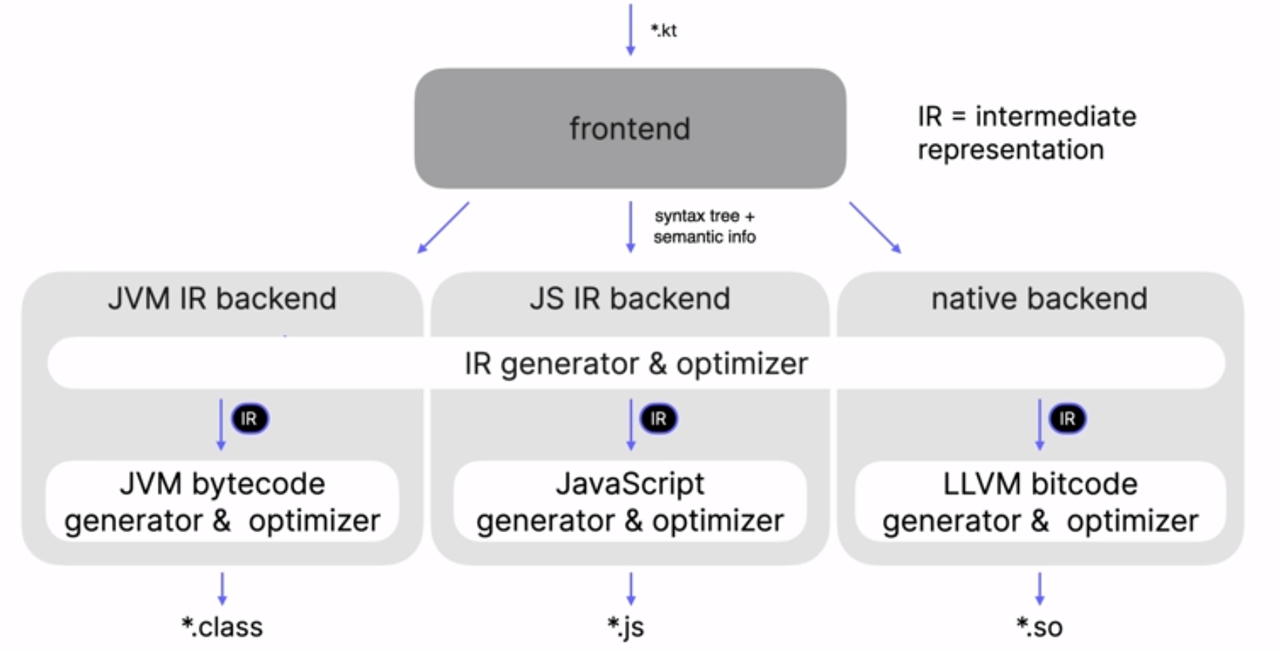
Kotlin 是一门跨平台的语言,可以将源码编译成4个平台的目标代码,因此需要有4个不同的编译器后端
编译器前端 前端负责构建抽象语法树 AST 和语义信息
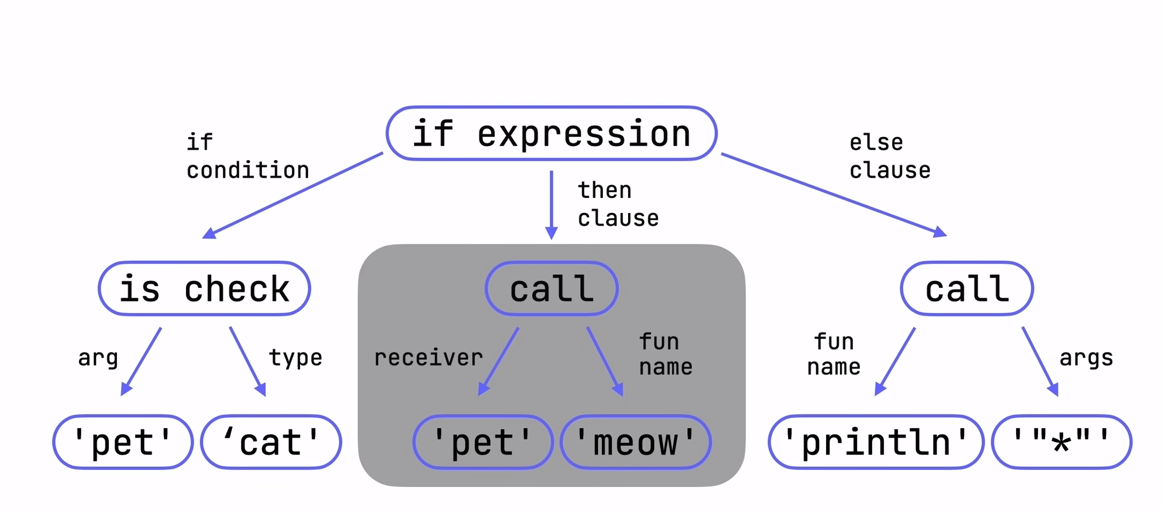
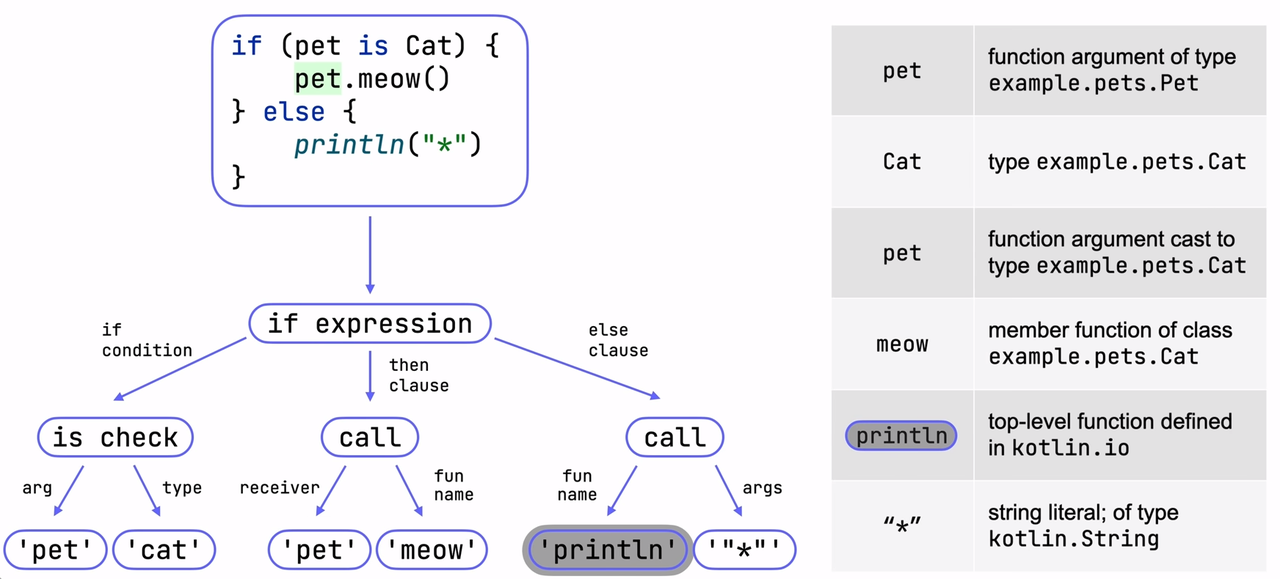
1
2
3
4
5
if (pet is Cat){ pet.meow() } else { println("*" ) }
编译器想要认识上面的代码,第一步就是给它添加结构,结构由 Kotlin 语法定义,Kotlin 编译器会根据语法解析输入的源代码,借助 parser 构建出一棵 AST
通过语法解析,parser 知道这段代码分成三个部分,if 条件、then 子句与 else 子句,并将结果以一颗树的形式存储
semantic analyzer 分析出语义信息,并将它们存储在一张表里,这张表是包含语法树所有节点额外信息的一个 map
K1 前端:编译产物是 PSI 和 BindingContext,PSI 可以看作 JetBrains 专用的 AST,而 BindingContext 则相当于 PSI 树配套的语义信息表
K2 前端:引入了 FIR ,不再把语法树和语义信息表分别存储,FIR 是一棵带有语义信息的树,整合了 PSI 与 BindingContext,能更快速地查找符号信息
编译器后端 后端基于 AST 等前端产物,生成平台目标代码
IR 是连接前后端的中间产物, 它也是一棵 AST,相比于 FIR 抽象表达层次更低级,更贴近 CPU 的架构,提供了更多的语义信息
引入 IR 的目的是在不同的后端共享编译逻辑,降低不同平台支持新语言特性的成本
1
2
3
4
5
6
7
8
9
10
fun main () println("Hello, World!" ) } MODULE_FRAGMENT name:<main> FILE fqName:<root> fileName:/var /folders/lt/k622ndqs14l7_tcxst93z3cm0000gp/T/Kotlin-Compilation7335327567848552666/sources/main.kt FUN name:main visibility:public modality:FINAL <> () returnType:kotlin.Unit BLOCK_BODY CALL 'public final fun println (message: kotlin.Any?): kotlin.Unit [inline] declared in kotlin.io.ConsoleKt' type=kotlin.Unit origin=null message: CONST String type=kotlin.String value="Hello, World!"
各平台的后端基于 IR 生成目标代码,从而实现多平台复用编译逻辑
编译器流程 KCP 通常在语义解析和 IR 生成两个阶段实现。这个时候编译器已经构建完 AST 并进行了语义分析,有足够的信息来扩展功能
KCP 实现
目标:实现一个 KCP,打印模块内的文件名、class 名和函数签名
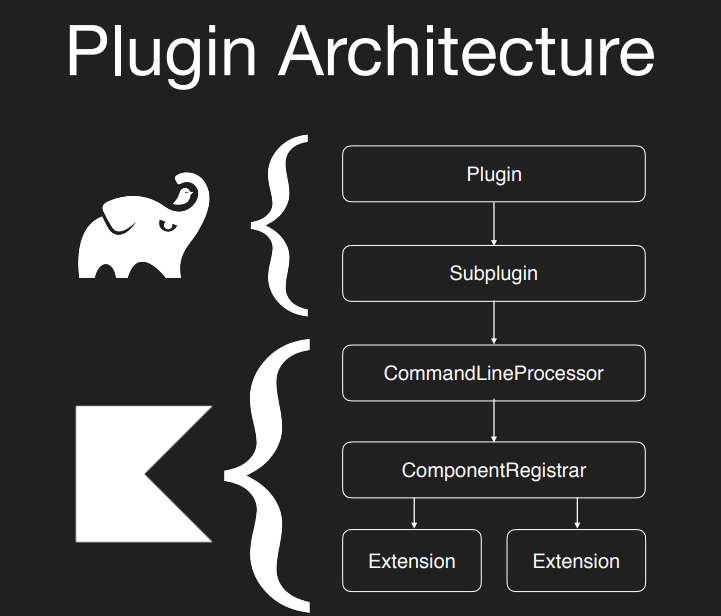
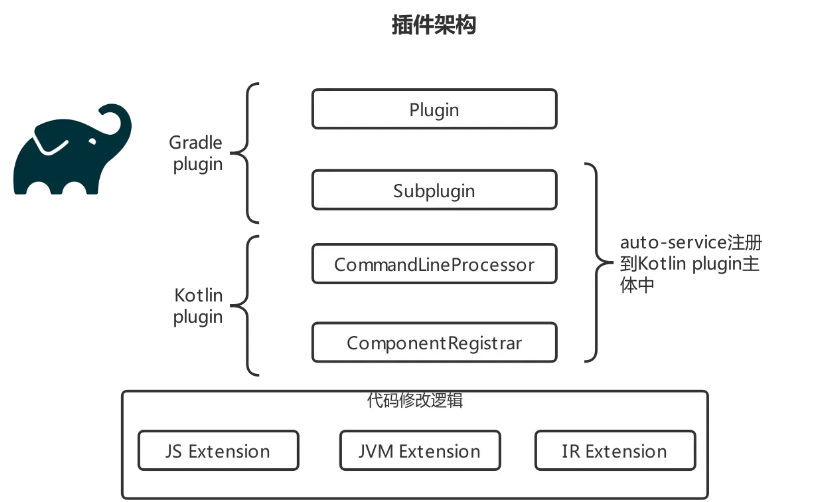
KCP 架构 一个完整的 KCP 由 Gradle Plugin 和 Kotlin Plugin 两部分组成
Gradle Plugin
Plugin:可以通过 Gradle Extension 配置参数信息
Subplugin:桥接 Gradle Plugin 和 Kotlin Plugin,并将配置的参数传递给 Kotlin Plugin
Kotlin Plugin
CommandLineProcessor:KCP 的入口,定义 KCP 的 ID、处理命令行参数
ComponentRegister:注册 Extension
Extension:实现 KCP 的主要功能,Kotlin 提供了多种类型的 Extension
Extension
编译时作用
IrGenerationExtension
访问 IR 生成的过程
ExpressionCodegenExtension
访问字节码生成的过程
ClassBuilderInterceptorExtension
拦截类的构建过程
StorageComponentContainerContributor
向存储组件容器中添加自定义组件
项目结构
1
2
3
4
5
6
7
8
9
10
11
12
13
14
15
16
17
printer-plugin/src └── main └── kotlin ├── CommandLineProcessorPrinter.kt ├── CompilerPluginRegistrarPrinter.kt ├── IrExtensionPrinter.kt └── IrVisitorPrinter.kt src └── main └── kotlin ├── sample_1.kt └── sample_2.kt printer-gradle-plugin/src └── main └── kotlin ├── EmptyGradleExtension.kt └── GradlePluginPrinter.kt
Step 1 添加依赖 在 build.gradle 配置依赖
1
2
3
4
5
6
7
8
9
10
11
plugins { kotlin("jvm" ) version "1.9.22" id("com.github.gmazzo.buildconfig" ) version "5.3.5" apply false id("com.gradle.plugin-publish" ) version "1.2.1" apply false } buildscript { extra["printer-plugin" ] = "printer" }
Step 2 实现 Gradle Plugin 对应 KCP 架构中的 Plugin 和 Subplugin
配置 build.gradle.kts
1
2
3
4
5
6
7
8
9
10
11
12
13
14
15
16
17
18
19
20
21
22
23
24
25
26
27
28
29
plugins { kotlin("jvm" ) id("java-gradle-plugin" ) id("com.github.gmazzo.buildconfig" ) } dependencies { implementation(kotlin("gradle-plugin-api" )) } buildConfig { val project = project (":printer-plugin" ) packageName(project .group .toString()) buildConfigField("String" , "KOTLIN_PLUGIN_ID" , "\"${rootProject.extra[" printer-plugin"]}\"" ) buildConfigField("String" , "KOTLIN_PLUGIN_GROUP" , "\"${project.group}\"" ) buildConfigField("String" , "KOTLIN_PLUGIN_NAME" , "\"${project.name}\"" ) buildConfigField("String" , "KOTLIN_PLUGIN_VERSION" , "\"${project.version}\"" ) } gradlePlugin{ plugins { create("printer-plugin" ) { id = rootProject.extra["printer-plugin" ] as String displayName = "printer-plugin" description = "printer-plugin" implementationClass = "GradlePluginPrinter" } } }
实现 KotlinCompilerPluginSupportPlugin
1
2
3
4
5
6
7
8
9
10
11
12
13
14
15
16
17
18
19
20
21
22
23
24
class GradlePluginPrinter : KotlinCompilerPluginSupportPlugin { override fun apply (target: Project ) Unit = with(target) { extensions.create("EmptyGradleExtension" , EmptyGradleExtension::class .java) } override fun isApplicable (kotlinCompilation: KotlinCompilation <*>) Boolean = true override fun getCompilerPluginId () override fun getPluginArtifact () groupId = BuildConfig.KOTLIN_PLUGIN_GROUP, artifactId = BuildConfig.KOTLIN_PLUGIN_NAME, version = BuildConfig.KOTLIN_PLUGIN_VERSION ) override fun applyToCompilation (kotlinCompilation: KotlinCompilation <*>) val project = kotlinCompilation.target.project return project.provider { emptyList() } } }
Step 3 实现 Kotlin Plugin 对应 KCP 架构中的 CommandLineProcessor、ComponentRegistrar 和 Extension
配置 build.gradle.kts@AutoService 在编译时自动生成 META-INF/services 的配置文件
1
2
3
4
5
6
7
8
9
10
11
12
13
14
15
16
plugins { kotlin("jvm" ) version "1.9.22" kotlin("kapt" ) id("com.github.gmazzo.buildconfig" ) } dependencies { compileOnly("org.jetbrains.kotlin:kotlin-compiler-embeddable:1.8.20" ) compileOnly("com.google.auto.service:auto-service-annotations:1.0.1" ) kapt("com.google.auto.service:auto-service:1.0.1" ) } buildConfig { packageName(group.toString()) buildConfigField("String" , "KOTLIN_PLUGIN_ID" , "\"${rootProject.extra["printer-plugin" ]} \"" ) }
实现 CommandLineProcessor
1
2
3
4
5
6
7
8
9
10
11
12
13
14
15
16
17
@AutoService(CommandLineProcessor::class) class CommandLineProcessorPrinter : CommandLineProcessor { override val pluginId: String = BuildConfig.KOTLIN_PLUGIN_ID override val pluginOptions: Collection<AbstractCliOption> = emptyList() @OptIn(ExperimentalCompilerApi::class) override fun processOption ( option: AbstractCliOption , value: String , configuration: CompilerConfiguration ) super .processOption(option, value, configuration) } }
实现 CompilerPluginRegistrar
1
2
3
4
5
6
7
8
9
10
11
12
13
14
15
@OptIn(ExperimentalCompilerApi::class) @AutoService(CompilerPluginRegistrar::class) class CompilerPluginRegistrarPrinter : CompilerPluginRegistrar () { override val supportsK2 = false override fun ExtensionStorage.registerExtensions (configuration: CompilerConfiguration ) val logger = configuration.get ( CLIConfigurationKeys.ORIGINAL_MESSAGE_COLLECTOR_KEY, MessageCollector.NONE ) val loggingTag = "printer" IrGenerationExtension.registerExtension(IrExtensionPrinter(logger, loggingTag)) } }
实现 IrGenerationExtension
IrModuleFragment:IR 树的根节点,可以通过它遍历整棵 IR 树,继承自 IrElement
IrElement:所有 IR 元素的父类
IrElementVisitor:定义了一系列方法,能够精细地访问 IR 树的各个节点
accept 一般会调用 IrElementVisitor 对应的 visitXXX 方法,acceptChildren 则会依次调用 IR 子元素的 accept 方法
1 2 3 4 5 6 7 8 9 10 11 12 13 14 15 interface IrElement { fun <R, D> accept (visitor: IrElementVisitor <R , D>, data : D ) fun <D> transform (transformer: IrElementTransformer <D >, data : D ) fun <D> acceptChildren (visitor: IrElementVisitor <Unit , D>, data : D ) fun <D> transformChildren (transformer: IrElementTransformer <D >, data : D ) }
在这里我们仅需要访问 IR,由于没有其他对象传递,使用 IrElementVisitorVoid 即可
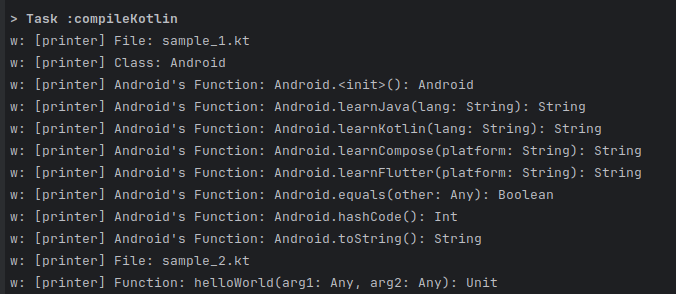
1
2
3
4
5
6
7
8
9
10
11
12
13
14
15
16
17
18
19
20
21
22
23
24
25
26
27
28
29
30
31
32
33
34
35
36
37
38
39
40
41
42
43
44
45
46
47
48
49
50
51
52
53
54
55
56
57
58
59
60
61
62
63
64
65
66
67
68
69
internal class IrExtensionPrinter ( private val logger: MessageCollector, private val loggingTag: String, ) : IrGenerationExtension { override fun generate ( moduleFragment: IrModuleFragment , pluginContext: IrPluginContext ) moduleFragment.accept(IrVisitorPrinter(logger, loggingTag), null ) } } internal class IrVisitorPrinter ( private val logger: MessageCollector, private val loggingTag: String, ) : IrElementVisitorVoid { override fun visitModuleFragment (declaration: IrModuleFragment ) declaration.files.forEach { file -> file.accept(this , null ) } } override fun visitFile (declaration: IrFile ) logger.report(CompilerMessageSeverity.WARNING, "[$loggingTag ] File: ${declaration.name} " ) declaration.declarations.forEach { item -> item.accept(this , null ) } } override fun visitFunction (declaration: IrFunction ) val render = buildFunctionString(declaration) logger.report(CompilerMessageSeverity.WARNING, "[$loggingTag ] Function: $render " ) } override fun visitClass (declaration: IrClass ) val className = declaration.symbol.owner.name.asString() logger.report(CompilerMessageSeverity.WARNING, "[$loggingTag ] Class: $className " ) declaration.declarations.forEach { member -> if (member is IrFunction) { val render = buildFunctionString(member) logger.report(CompilerMessageSeverity.WARNING, "[$loggingTag ] $className 's Function: $render " ) } else { member.accept(this , null ) } } } private fun buildFunctionString (member: IrFunction ) val render = buildString { append(member.fqNameWhenAvailable!!.asString() + "(" ) val parameters = member.valueParameters.iterator() while (parameters.hasNext()) { val parameter = parameters.next() append(parameter.name.asString()) append(": ${parameter.type.classFqName!!.shortName().asString()} " ) if (parameters.hasNext()) append(", " ) } append("): " + member.returnType.classFqName!!.shortName().asString()) } return render } }
最后在 build.gradle 配置 KCP
1
2
3
dependencies { PLUGIN_CLASSPATH_CONFIGURATION_NAME(project (":printer-plugin" )) }
Demo
1
2
3
4
5
6
7
8
9
class Android { fun learnJava (lang: String ) fun learnKotlin (lang: String ) fun learnCompose (platform: String ) fun learnFlutter (platform: String ) } fun helloWorld (arg1: Any , arg2: Any ) Unit fun fuckHUST (arg: Any )
KSP 实现 用 KCP 开发挺麻烦的,我们也可以用 KSP 自定义注解 @Print 来实现打印功能
什么是 KSP Kotlin Symbol Processing,由 Google 推出,专门处理 Kotlin 符号,它基于 KCP 实现,简化了编译器插件的开发流程,比 KCP 更容易上手
Kotlin Symbol Processing (KSP) is an API that you can use to develop lightweight compiler plugins. KSP provides a simplified compiler plugin API that leverages the power of Kotlin while keeping the learning curve at a minimum. Compared to kapt, annotation processors that use KSP can run up to two times faster.
KSP 开发流程
实现 SymbolProcessorProvider:KSP 执行的入口,为 SymbolProcessor 提供必要的环境
实现 SymbolProcessor:处理符号,实现自定义逻辑
1
2
3
interface SymbolProcessorProvider { fun create (environment: SymbolProcessorEnvironment ) }
SymbolProcessorEnvironment:提供编译时的依赖,如 logger 打印日志,codeGenerator 生成和管理文件
Resolver:提供处理符号的各种方法
1
2
3
4
5
interface SymbolProcessor { fun process (resolver: Resolver ) fun finish () fun onError () }
Step 1 添加依赖
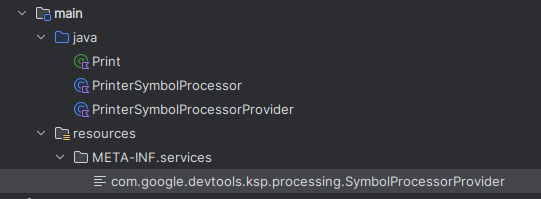
项目结构
1
2
3
4
5
6
7
8
9
10
11
12
13
plugin/src └── main ├── java │ ├── PrinterSymbolProcessor.kt │ ├── PrinterSymbolProcessorProvider.kt │ └── Print.kt └── resources └── META-INF sample/src └── main └── java ├── sample_1.kt └── sample_2.kt
1
2
3
4
5
6
7
plugins { kotlin("jvm" ) } dependencies { implementation("com.google.devtools.ksp:symbol-processing-api:1.9.21-1.0.15" ) }
Step 2 实现 SymbolProcessorProvider
SymbolProcessorProvider 基于 spi 服务机制,需要在 resource/META-INF/services 下定义 com.google.devtools.ksp.processing.SymbolProcessorProvider(也可以用 auto-service 依赖)
1
2
3
4
5
class PrinterSymbolProcessorProvider () : SymbolProcessorProvider { override fun create (environment: SymbolProcessorEnvironment ) return PrinterSymbolProcessor(environment.logger) } }
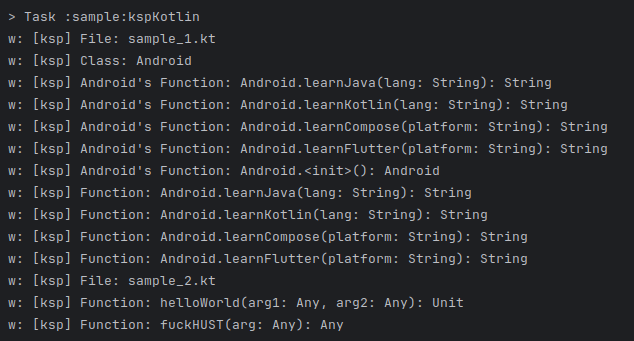
Step 3 实现 SymbolProcessor 1 2 3 4 5 6 7 8 9 10 11 12 13 14 15 16 17 18 19 20 21 22 23 24 25 26 27 28 29 30 31 32 33 34 35 36 37 38 39 class PrinterSymbolProcessor (private val logger: KSPLogger) :SymbolProcessor { override fun process (resolver: Resolver ) val symbols = resolver.getSymbolsWithAnnotation("Print" ) symbols.forEach { symbol -> when (symbol) { is KSFunctionDeclaration -> { val signature = getSignature(symbol) logger.warn("Function: $signature " ) } is KSClassDeclaration -> { val classSignature = symbol.qualifiedName?.asString() logger.warn("Class: $classSignature " ) symbol.getDeclaredFunctions().forEach { function -> val signature = getSignature(function) logger.warn("$classSignature 's Function: $signature " ) } } is KSFile -> { logger.warn("File: ${symbol.fileName} " ) } } } return emptyList() } private fun getSignature (symbol: KSFunctionDeclaration ) val signature = buildString { append(symbol.qualifiedName?.asString()) append("(" ) symbol.parameters.forEachIndexed { index, parameter -> if (index > 0 ) append(", " ) append("${parameter.name?.asString()} : ${parameter.type} " ) } append("): ${symbol.returnType} " ) } return signature } }
自定义注解 @Print
1
2
@Target(AnnotationTarget.FILE, AnnotationTarget.FUNCTION, AnnotationTarget.CLASS) annotation class Print
Step 4 测试 接下来测试 @Print 的功能,导入 plugin 模块
1
2
3
4
5
6
7
8
9
10
11
12
13
14
15
16
plugins { kotlin("jvm" ) id("com.google.devtools.ksp" ) version "1.9.21-1.0.15" } kotlin.sourceSets .main { kotlin.srcDirs( file ("$buildDir/generated/ksp/main/kotlin" ), ) } dependencies { implementation("com.google.devtools.ksp:symbol-processing-api:1.9.21-1.0.15" ) implementation(project (":plugin" )) ksp(project (":plugin" )) }
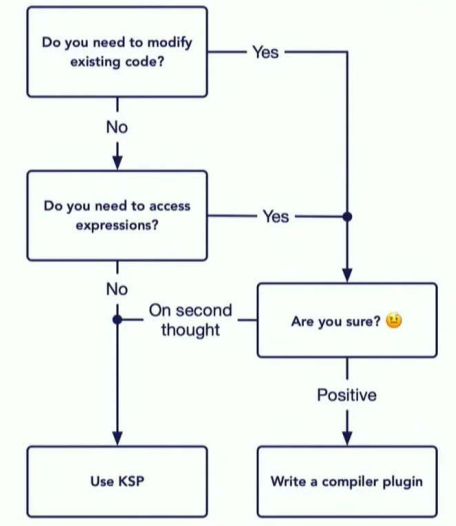
KCP vs KSP KCP
功能强大,可以接触编译器中几乎所有的细节,随心所欲魔改😍
学习成本高,开发费时😣
维护困难,对编译器更改敏感
KSP
非常简单,屏蔽了许多编译器的细节😋
功能是 KCP 的子集,一般用于处理注解
编译时不能修改源码,也不能检查表达式
开发插件时首选 KSP,需要修改源码或者闲得发慌时选择 KCP
参考K2编译器之路 Writing Your First Kotlin Compiler Plugin
cover